
Video is one of the best ways for capturing audience attention. Product demonstrations, property tours, tutorials, and keynotes all make great content—provided that they’re readily searchable by your team and visitors alike. Even though tagging and categorization help organize videos and make them easy to find, the labeling process is labor intensive, taking time away from key tasks like creating new videos.
The solution? Automation. Through machine learning (ML) algorithms, Cloudinary’s video-tagging feature automatically detects video content. Video tagging extends image classification to image sequences, capable of detecting types of scenes (cities, mountains, the seaside) and objects (people, cars), and even inferring whether the content is appropriate for public viewing. Additionally, with video auto-tagging supplemented by detailed labels, you can moderate videos and automatically determine the minimum age for viewers.
Video auto-tagging benefits a wide range of apps. For example:
- For a basketball game, auto-tagging can identify which player has the ball and for how long. The team can then make use of that information in optimizing its game strategy.
- For personal protective equipment, such as face masks or hand covers, auto-tagging can help you pinpoint and recognize human emotions, automatically detecting if the people in a video are happy or sad, for example.
Those capabilities might be highly challenging to implement, however. Gratifyingly, many major IT companies have recognized the need, offering various cloud services with AI-powered image and video analysis. Nonetheless, because each provider has its own programming interfaces or SDKs, you must use several completely different toolsets, complicating the workflow.
Cloudinary’s convenient API simplifies video tagging through automation. You can decide which underlying tagging engine to use through the API and combine various services to further improve the tagging performance. This tutorial cites several use cases to which video tagging adds value, and steps you through an example that explains how to use Cloudinary’s API with the JavaScript client library. To follow this tutorial, you just need basic familiarity with HTML and JavaScript.
This is part of a series of articles about Marketing videos.
Organization of Media Library
Large companies often store hundreds or even thousands of videos in their website’s media library, which is a pain to organize. Organizing by file name or upload date is straightforward but unhelpful. Organizing through tagging, i.e., grouping videos by category, is much more effective. Instead of sorting videos into a single folder structure based on one basic property, you organize them by tag category, sorting footage by attribute, such as the featured product, location type, and color scheme.
The process of manually adding descriptions and tagging is arduous and time consuming, however. Auto-tagging categorizes videos automatically, making it easy to quickly find what you and your app users are looking for. The technology, which relies on artificial intelligence (AI) trained on large datasets, automatically recognizes and labels objects, such as cars and animals; attributes, such as color; and sentiments, such as adventure. Cloudinary, for example, combines AI from Google and other sources to automatically label the objects in your videos as you upload them, making tagging as simple and efficient as possible.

To work with the Cloudinary API, start by uploading your media assets. (Note that even though that post refers to examples on image upload, they apply to videos, too.) During the upload, you can specify the public identifier (ID) of your assets and divide them into folders to create structured delivery URLs. Alternatively, you can group the assets in folders and subfolders, organizing the media library according to the same structure as your on-premise server.
While uploading media to Cloudinary, you can also apply transformations, e.g., on-the-fly video encoding and delivery, transcoding, resizing, and cropping, which can convert videos to animated images and even add blurred backgrounds.
User-Uploaded Content
For all that user-uploaded content enhances your website, you cannot assume that your users are as knowledgeable and skilled as your internal team or that they would mount the level of effort for tagging and descriptions. For instance, if you’re running a real-estate website, users would upload videos of their property but might not accurately tag all the elements in the video. Instead, you can rely on auto-tagging to find objects like “pool” and “palm tree,” which certain house shoppers might be looking for. Those tags greatly improve the listing’s discoverability and searchability.
Another example: Consider an animal shelter that posts videos of animals that are up for adoption. Instead of having to manually type in a comprehensive set of tags for each animal, the staff needs to enter only the basic information, based on which the auto-tagging capability can figure out the animal type (like cat, dog, hamster, or horse), color, and other attributes.
Any web app into which users can upload their media can benefit from the Cloudinary API, saving you the time and effort of building the capabilities yourself: upload, transformation, storage, and so on. Another alternative is to adopt serverless approaches like AWS Lambda or Azure Functions, which is easier than manual tagging. However, processing large videos with those services is either impossible (Lambda has an execution-time limit) or expensive (you pay for the execution time—the long tasks incur significantly higher costs). Ultimately, Cloudinary is the best answer for processing and tagging videos.
Auto-Tagging in Action
The demo below, which makes use of a Pexels video of a giraffe in the wild, shows you how to use Cloudinary’s video-tagging feature with the JavaScript SDK.
First, upload the video with the upload method or the Cloudinary upload widget on the Cloudinary portal. Here, you use the upload widget to access the advanced video uploader. Integrate the upload widget with your site by referencing the JavaScript. Afterwards, you can use the various widget initialization methods.
The upload widget supports signed and unsigned uploads. For this demo, use unsigned uploads, which require the upload preset. See the related documentation on how to create an unsigned preset in the Cloudinary management console.

When configuring the upload preset, you can also enable video auto-tagging on upload, setting your preference for how “confident” you want the algorithm to be before applying a tag. To do so, click the Media analysis and AI tab of your preset, choose a categorization engine (for example, Google Automatic Video Tagging), and set the auto-tagging threshold (0.5), which denotes 50% confidence, as shown below:

Next, proceed to implementation. See the complete source code on GitHub. Follow these steps:
1. Create a simple HTML page that references the Cloudinary widget scripts and that contains a button serving as the upload widget’s opener. For example:
…
Now add custom JavaScript to handle the logic. Here, you create the upload widget and then store the reference to it under the uploadWidget variable:
var uploadWidget = cloudinary.createUploadWidget({
    cloudName: '',
    uploadPreset: 'autotagging-preset',
    sources: [
        'local'
    ],
    cropping: false,
    multiple: false,
    styles: {
    palette: {
        window: "#10173a",
            sourceBg: "#20304b",
            windowBorder: "#7171D0",
            tabIcon: "#79F7FF",
            inactiveTabIcon: "#8E9FBF",
            menuIcons: "#CCE8FF",
            link: "#72F1FF",
            action: "#5333FF",
            inProgress: "#00ffcc",
            complete: "#33ff00",
            error: "#cc3333",
            textDark: "#000000",
            textLight: "#ffffff"
        }
    }
}, (error, result) => uploadCallback(error, result));
2. Generate the above code on Cloudinary’s Upload Widget Demo page to visually configure the widget and get the corresponding configuration code.
Show the widget by calling the open method, like this:
$('#upload_widget_opener').click(() => {
    uploadWidget.open();
});
3. Click the Upload video file button. The app then displays the upload widget:

4. Implement the uploadCallback function, which is invoked by the upload widget for specific events, for example, when the asset is uploaded.
function uploadCallback(error, result) {
    if (!error && result && result.event === "success") {

        // Cloudinary API info
        const apiKey = '';
        const apiSecret = '';
        const baseUrl ='api.cloudinary.com/v1_1//resources/video/upload/';

        const url = 'https://' + apiKey +':' + apiSecret
            + '@' + baseUrl + result.info.public_id;

        $infoLink.attr("href", url);
        $infoLink.show();
    }
}
Here, the callback creates the URL to upload resources. The URL is supplemented by basic authorization (Cloudinary’s API and secret) and is displayed as an HTML tag next to the Upload video file button (see the screenshot above).
5. Click the generated URL for details on the resource along with the video tags in JSON format, for example:
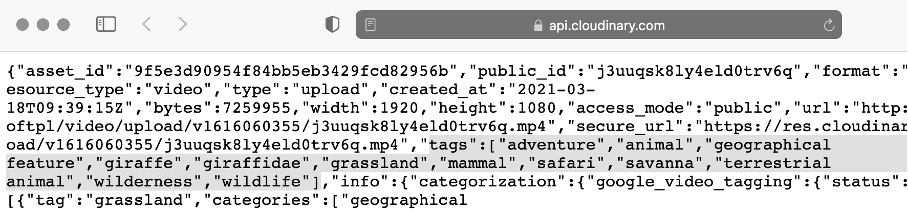
As shown, Cloudinary successfully tagged the giraffe video with the appropriate keywords, from the type of animal to the type of environment, and to helpful words like the activity “safari” and the sentiment “adventure.” With those useful tags, giraffe fans, students who are studying grasslands, and adventure-seeking travelers can all readily find and enjoy the video.
Next Steps
Tools like Cloudinary save you innumerable hours of manual labor. Not only does auto-tagging enable you and your team to stay organized, it also helps your audience find videos through which they can become acquainted with your goods and services on a deeper level than with images and text alone.
Now that you know how easy it is to use Cloudinary’s upload widget to automatically tag videos, why not incorporate this feature into your own app? Uploading your videos and encouraging your users to share theirs helps the audience find what they need: from adventure seekers in search of wildlife to homeowners looking for decorative trim and picture windows, and to pet lovers finding their lifelong companion.
Do give auto-tagging a try and discover how Cloudinary can enhance your app’s videos. Start by signing up for a free account along with free credits.
;rgba(153,153,153,0.1);rgba(153,153,153,0.5)" dur="2s" repeatCount="indefinite" /></rect></svg>)