
The Cloudinary WordPress Plugin integrates smoothly with WordPress, moving your media files to Cloudinary’s powerful cloud infrastructure. This can free up your WordPress storage, depending on your chosen settings. Your images and videos are delivered through a high-performance content delivery network (CDN), ensuring fast loading times worldwide. Everything is managed within WordPress, so you enjoy better performance and easier media management without leaving your WordPress instance or disrupting your workflow.
Plus, by storing your media in Cloudinary, you gain the flexibility to easily reuse those assets across other platforms, including any external CMS or e-commerce platform, for a consistent and efficient media management experience.
WooCommerce, already integrated within WordPress, gains additional media management features from Cloudinary, enhancing its overall media handling capabilities.

We’ll explore how the Cloudinary WordPress Plugin can streamline your media management by diving into its sync and storage options. In addition, discover use cases, practical tips, and tools to optimize your WordPress site and enhance your media workflow and storage efficiency.
- Sign up for a free Cloudinary account.
- Install the Cloudinary WordPress plugin.
- Complete the setup wizard.
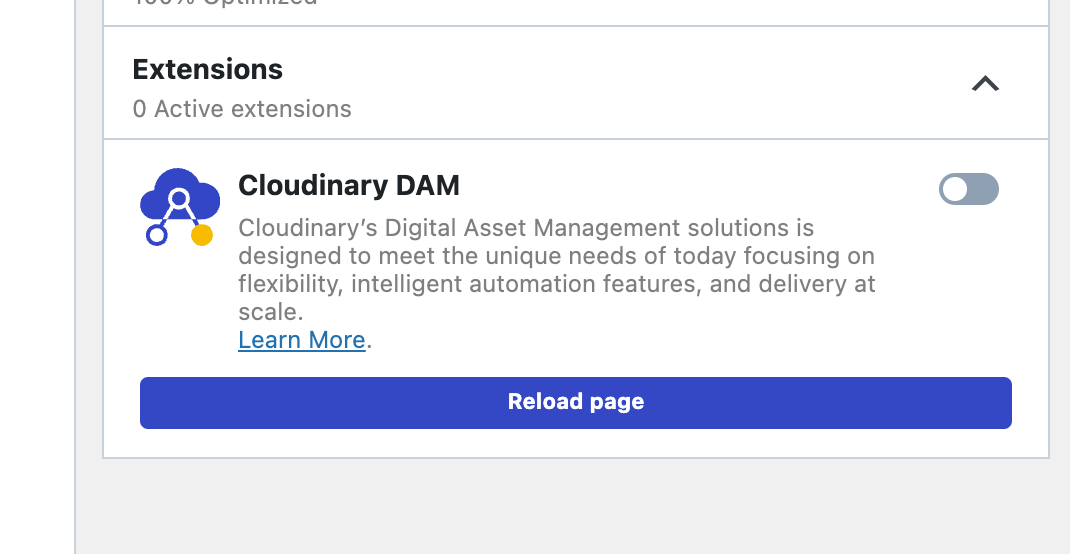
- Once you’ve installed the Cloudinary WordPress Plugin, select Cloudinary in the left navigation menu, and select Cloudinary DAM from the Extensions dropdown to enable the Media Library.
Your WordPress Plugin is installed and working with default settings and automatic media sync. Your images and videos are now optimized and delivered via a fast CDN!
To customize sync and storage options, navigate to Cloudinary > General settings.

Cloudinary provides versatile storage options for your WordPress media files. Choose the best fit for your needs:

- If freeing up WordPress storage is your priority, choose the Cloudinary Only option. This option is ideal for media-heavy sites like travel blogs or real estate listings. It stores all your media exclusively on Cloudinary, freeing up space on WordPress while ensuring fast loading times. You can easily switch back to serving assets from WordPress if needed.
- If you prefer having a fallback plan while still saving storage, select the Cloudinary and WordPress (Low Resolution) option. This moves all your media to Cloudinary and keeps low-resolution copies on WordPress for basic visibility. It’s perfect for small businesses like local cafés or bakeries, offering a good balance between cost savings and WordPress storage use.
- If having a full fallback is more important than saving storage, go with the Cloudinary and WordPress (Default) option. This stores your media on both Cloudinary and WordPress, providing Cloudinary’s optimization and fast delivery while enabling immediate access to assets in WordPress. It’s ideal for sites like design portfolios or e-commerce stores that require complete redundancy.
You can choose how your media files sync based on your needs for convenience or control:

- Auto Sync (default). Automatically syncs all changes and uploads the media files to Cloudinary. This option prioritizes convenience by handling synchronization seamlessly in the background. For instance, if you frequently add new blog posts with images, Auto Sync ensures all new media is instantly updated on Cloudinary without any extra effort from you.
- Manual Sync. Provides the flexibility to review and selectively sync media from WordPress to Cloudinary. This approach allows precise control over when files are delivered in their updated form. For example, if you want to review newly updated images and videos before delivering them from Cloudinary, Manual Sync lets you perform the sync only when you’re ready.
By default, your WordPress assets will sync to the root folder of your Cloudinary product environment. To specify a different location, set a folder path in your Media Library Sync Settings. For example, to store assets in the cld-images sub-folder within the wordpress-assets folder, configure the Cloudinary folder path as wordpress-assets/cld-images.
The Cloudinary WordPress Plugin offers flexible delivery options to suit different needs. With Manual Sync, you gain control over how and when media files are synced between WordPress and Cloudinary. This method allows you to:
- Optimize performance. Choose which assets are delivered from Cloudinary, taking advantage of its high-performance CDN for faster global delivery. For example, sync high-resolution images from a new blog post to boost page load speed without syncing all media.
- Control storage. Decide whether to keep files in WordPress for immediate access or offload them to Cloudinary, reducing storage demands on your WordPress site. For instance, sync old event photos that aren’t frequently accessed to Cloudinary to save space on WordPress while keeping more recent, frequently accessed images locally.
- Manage file types. Selectively sync specific file types, such as new gallery images that need optimization, to Cloudinary, while keeping others, such as PDFs that don’t need CDN benefits, in WordPress.
By using Manual Sync, you can tailor media delivery to fit your performance needs and storage preferences, ensuring that your critical media is delivered efficiently while maintaining control over where files are stored.
Use the bulk actions menu or the single file menu to sync and deliver files efficiently.


You can also add metadata for individual files to the Cloudinary Report.
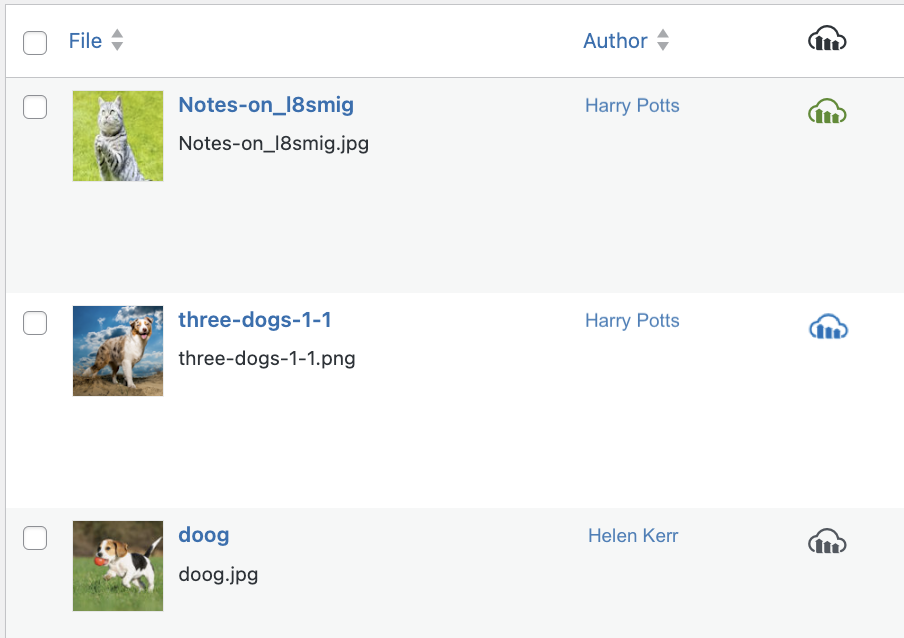
The color of the Cloudinary icon in your WordPress media library list view indicates the status of each asset:
Black icon. Asset not synced.
Blue icon. Delivered from WordPress.
Green icon. Synced with Cloudinary.
Take your WordPress storage optimization to the next level by utilizing Cloudinary’s advanced features for media management.
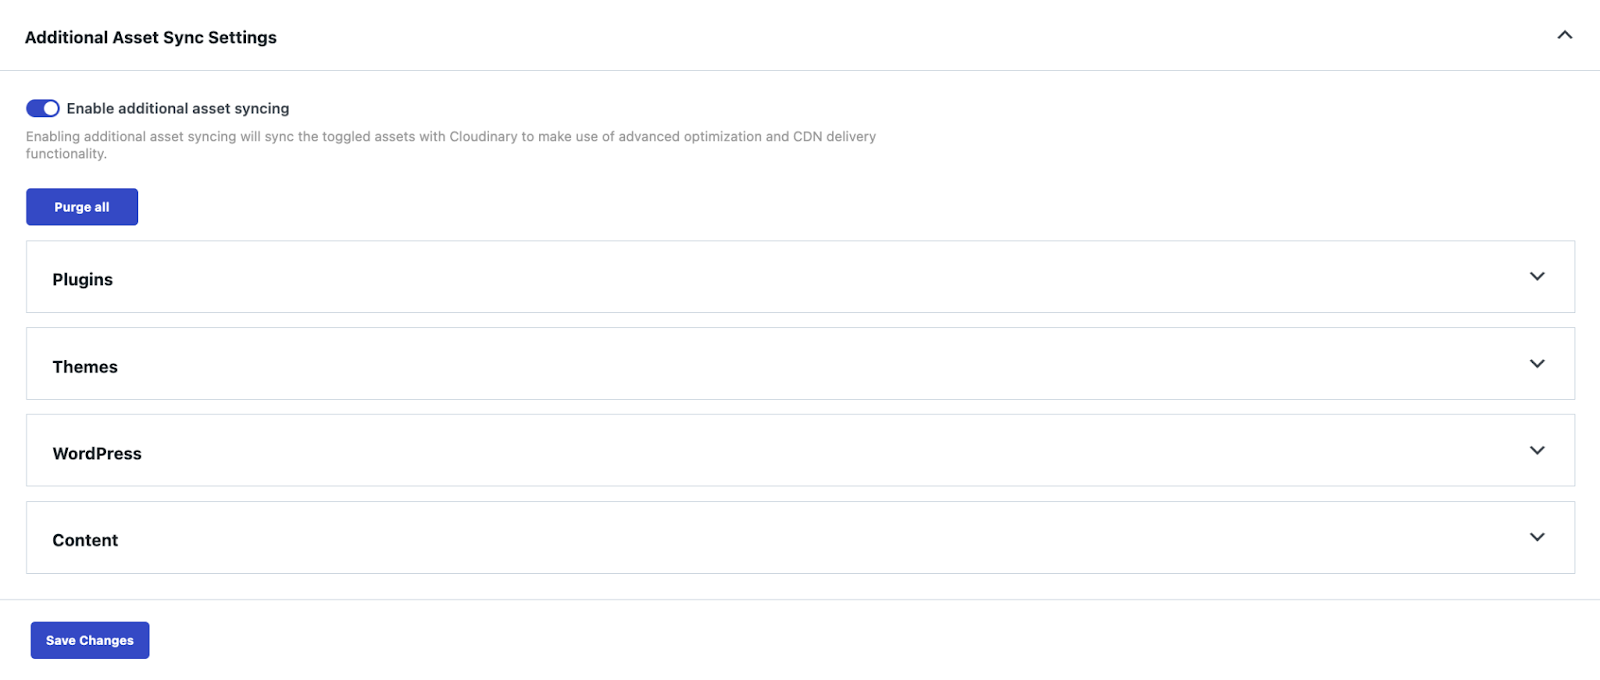
- Additional Asset Sync Settings. Extend Cloudinary’s benefits to media files beyond your WordPress media library. Sync assets from other plugins, themes, or external sources. For example, use this setting if your site uses a custom theme with built-in image assets that you want to sync to Cloudinary for optimization and delivery. Adjust settings in General Settings > Additional Asset Sync Settings.
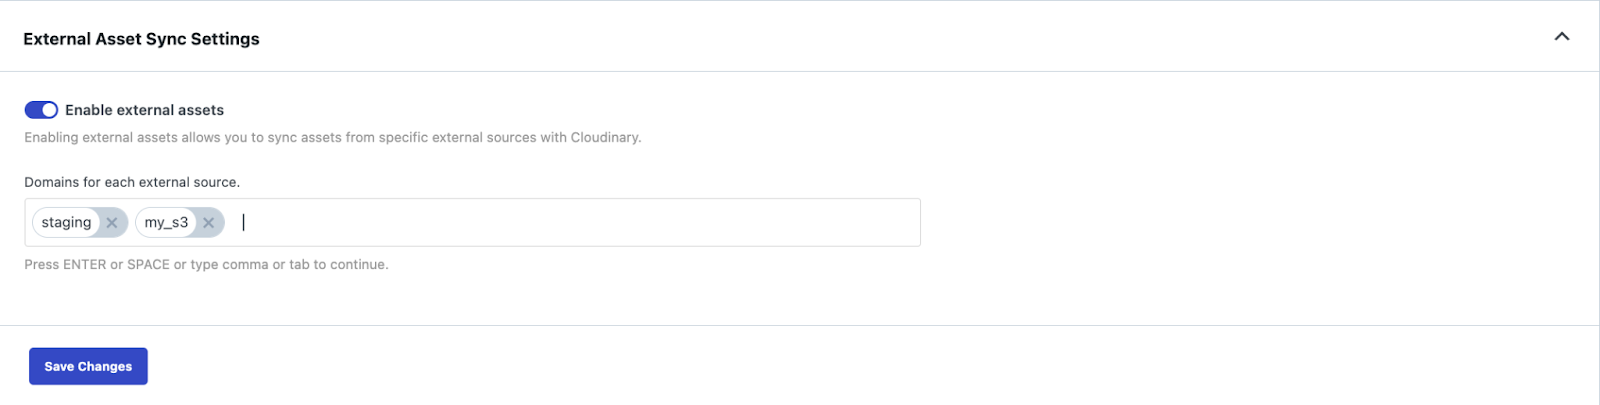
- External Asset Sync Settings. Sync externally hosted media (e.g., S3 bucket) or assets across multiple environments (e.g., staging, production) to Cloudinary. For example, if you host videos on an S3 bucket and want to use Cloudinary’s optimization and CDN, you can sync those assets to Cloudinary as well. Go to General Settings > External Asset Sync Settings to add relevant domains.
Stay updated on the delivery source of your assets directly from your website’s frontend. The Cloudinary plugin shows whether your images and videos are served from Cloudinary or directly from WordPress.
When media files are delivered from Cloudinary, you can instantly see how much bandwidth you’re saving through optimization. For instance, if you run an e-commerce business like a fashion boutique with high-quality product images, monitoring the real-time status helps you ensure that large files are being served in optimized formats like WebP, and transformations such as resizing or quality adjustments are correctly applied.
You can compare the local file size with the optimized size, view the optimized format used for delivery, and check the percentage reduction to ensure optimal performance. And, you can see which transformations were applied to the delivered media, helping you verify that every asset meets your performance and quality standards directly from your site.

The Cloudinary WordPress Plugin integrates Cloudinary as your central media management hub, offering features like bulk editing, AI-powered auto-tagging, metadata handling, and powerful search. The Cloudinary Media Library widget within WordPress lets you easily manage all your media files. For instance, on your e-commerce site, you can upload product images to Cloudinary directly from WordPress and quickly place shirt images on product pages.
Non-WordPress users can also use the Cloudinary Console to share media files, enhancing collaboration across teams and platforms. For example, designers can upload files to the Cloudinary Console, making them instantly available in WordPress through the Media Library widget. This streamlines workflows and ensures all team members have access to the latest media.

For large-scale operations, use the WordPress CLI to sync images via command line. This is ideal for extensive asset libraries. For example, if you’re migrating a vast collection of media files from a legacy site to your new WordPress site and need to sync thousands of images efficiently, using the CLI can streamline the process and save time.
For more information, read our documentation on managing media sync using the WP-CLI.
Unlock the full potential of your WordPress site with the Cloudinary Plugin! Whether you choose to sync your images and videos automatically for seamless updates or manually sync for precise control, Cloudinary’s flexible storage and sync options help you streamline media management and save on WordPress storage.
Enhance your site’s performance and efficiency today. Install the Cloudinary WordPress Plugin and transform the way you handle media. Contact us to start optimizing now.


