The image recognition market is experiencing exponential growth, compounded by recent developments in AI. According to a 2023 report, the global image recognition market is expected to grow from $43.6 billion in 2023 to 178.13.36 billion by 2032 (Source: Fortune Business Insights).
This surge is fueled by the increasing capabilities of image annotation, a powerful technique that allows developers to enhance images by adding labels, markers, and other visual elements. Whether you’re building a photo-sharing app, an e-commerce platform, or a scientific tool, understanding image annotation is essential as it allows one to highlight specific areas or add descriptive labels.
In this guide, we’ll implement JavaScript-based image annotation, covering everything from basic concepts to advanced techniques. We’ll use Cloudinary, a cloud-based media management platform that provides a comprehensive suite of tools for managing, optimizing, and delivering images and videos.
Join thousands of businesses transforming their digital asset management with Cloudinary. Sign up for free today!
In this article:

What Is Image Annotation and Why Is It Important?
Image annotation is the process of labeling images with metadata to provide context and make them easily searchable. This technique is widely used in machine learning and artificial intelligence, where annotated images are crucial for training algorithms to recognize and interpret visual data. By accurately tagging various elements within an image, developers can create more intelligent and responsive applications that understand visual content as humans do.
The importance of image annotation cannot be overstated, especially in fields like computer vision, augmented reality, and autonomous driving. Annotated images are the foundation for building datasets that teach machines to identify objects, detect anomalies, and perform complex visual tasks.
In addition, image annotation enhances user interaction and accessibility, allowing users to engage with visual content more meaningfully. This means better customer experiences and more efficient automation processes for businesses, leading to increased innovation and competitive advantage.
Implementing JavaScript Image Annotation
For this tutorial, we will be using Cloudinary for image annotations. If you don’t already have an account, don’t worry! You can sign up for a free account and follow along.
Next, log in to your Cloudinary account and click the Programmable Media button at the top-left corner of your screen to navigate to the Programmable Media Dashboard tab. Here, you will see your Cloudinary API credentials. Copy these as we will need them later:

With this, we can begin creating our JS app for image annotations.
Creating Your First JavaScript Image Annotation
Now that we’ve set up our Cloudinary cloud, let’s begin creating our image annotation app. We will start by creating a JavaScript server that will upload an image to the Cloudinary cloud and generate an annotation for it.
To do this, create a new JS file in your project directory and start by installing some dependencies using the following npm command:
npm install cloudinary multer cors express
Next, open up your JS file and start by importing the dependencies and setting up your Cloudinary API:
const express = require('express');
const multer = require('multer');
const cloudinary = require('cloudinary').v2;
const cors = require('  s');

const app = express();
const port = 3000;

// Configure Cloudinary credentials
cloudinary.config({
    cloud_name: 'your_cloud_name',
    api_key: 'your_api_key',
    api_secret: 'your_api_secret'
});
Here, we create an app using Express and opening port 3000 on our system to process requests.
Next, we set up Multer to handle all our uploads as well as enable Cors to allow us to process requests from any origins:
// Set up Multer for handling file uploads
const storage = multer({ dest: 'uploads/' });

// Enable CORS for all origins (for development purposes)
app.use(cors({
    origin: '*', // Allow any origin
    credentials: true
}));
Now, we will create a simple upload endpoint using express:
// Route for handling file uploads
app.post('/upload', storage.single('file'), async (req, res) => {
    console.log("Upload API Called");
    try {
        // Upload the file to Cloudinary with specified options
        const uploadResult = await cloudinary.uploader.upload(req.file.path, {
            type: 'upload',
            categorization: 'aws_rek_tagging',
            auto_tagging: 0.7,
            // Add any desired transformations here
        });

        // Send the secure URL and tags back to the client
        res.json({ url: uploadResult.secure_url, tags: uploadResult.tags });

        console.log({ url: uploadResult.secure_url, tags: uploadResult.tags });
    } catch (error) {
        console.error('Upload Error:', error);
        res.status(500).send('Upload failed');
    }
});
Here, we use Cloudinary API’s uploader.upload() method to upload an image to the Cloudinary cloud. We also add a type parameter to specify it as an upload. Next, we define a categorization parameter as aws_rek_tagging that uses Amazon’s image recognition tool to generate tags for our image. You can learn more about how to set up Amazon Rekognition by checking out this article.
Finally, we define the auto-tagging parameter as 0.7, which only returns results with a confidence level of more than 0.7. We then return the result in JSON format as a response to the POST request.
We can start our server and listen to requests on our port. Here is what our complete server file looks like:
const express = require('express');
const multer = require('multer');
const cloudinary = require('cloudinary').v2;
const cors = require('  s');

const app = express();
const port = 3000;

// Configure Cloudinary credentials
cloudinary.config({
    cloud_name: 'your_cloud_name',
    api_key: 'your_api_key',
    api_secret: 'your_api_secret'
});

// Set up Multer for handling file uploads
const storage = multer({ dest: 'uploads/' });

// Enable CORS for all origins (for development purposes)
app.use(cors({
    origin: '*', // Allow any origin
    credentials: true
}));

// Route for handling file uploads
app.post('/upload', storage.single('file'), async (req, res) => {
    console.log("Upload API Called");
    try {
        // Upload the file to Cloudinary with specified options
        const uploadResult = await cloudinary.uploader.upload(req.file.path, {
            type: 'upload',
            categorization: 'aws_rek_tagging',
            auto_tagging: 0.7,
            // Add any desired transformations here
        });

        // Send the secure URL and tags back to the client
        res.json({ url: uploadResult.secure_url, tags: uploadResult.tags });

        console.log({ url: uploadResult.secure_url, tags: uploadResult.tags });
    } catch (error) {
        console.error('Upload Error:', error);
        res.status(500).send('Upload failed');
    }
});

// Start the server
app.listen(port, () => console.log(`Server is running on port ${port}`));
Now that our server is complete, we need to create a simple page that will allow us to generate annotations.
To do this, open up a new HTML file and add a simple upload form that allows us to select a file from our system. Next, we will also add a paragraph tag that will enable us to display the generated tags:
<body>
  <div class="container">
    <h1>Image Annotator</h1>
    <form id="uploadForm">
      <input type="file" name="file" id="fileInput">
      <button type="submit">Upload</button>
    </form>
    <div id="uploadStatus">
      <p id="tags"></p>
    </div>
  </div>

</body>
Finally, we will use the <script> tag to generate a simple POST request to our endpoint, allowing us to upload our image file to the cloud, display the image, and finally generate our tags. Here is what our complete HTML file looks like:
<!DOCTYPE html>
<html lang="en">

<head>
  <meta charset="UTF-8">
  <meta name="viewport" content="width=device-width, initial-scale=1.0">
  <title>Image Annotator Using Cloudinary</title>
  <link rel="stylesheet" href="style.css">
</head>

<body>
  <div class="container">
    <h1>Image Annotator</h1>
    <form id="uploadForm">
      <input type="file" name="file" id="fileInput">
      <button type="submit">Upload</button>
    </form>
    <div id="uploadStatus">
      <p id="tags"></p>
    </div>
  </div>

  <script>
    // Get the form, status display, and tags paragraph elements
    const formUpload = document.getElementById('uploadForm');
    const statusDisplay = document.getElementById('uploadStatus');
    const tagsParagraph = document.getElementById('tags');

    // Add event listener for the form submission
    formUpload.addEventListener('submit', function (event) {
      event.preventDefault(); // Prevent the default form submission behavior

      const inputfile = document.getElementById('fileInput');
      const selectedFile = inputfile.files[0]; // Get the file selected by the user

      // Create a FormData object and append the file
      const formData = new FormData();
      formData.append('file', selectedFile);

      // Send the POST request to the server
      fetch('http://localhost:3000/upload', {
        method: 'POST',
        body: formData,
      })
        .then(response => response.json())
        .then(data => {
          console.log(JSON.stringify(data));
          // Check if tags are present and display them
          if (data.tags && Array.isArray(data.tags)) {
            tagsParagraph.textContent = 'Tags: ' + data.tags.join(', ');
          }

          // Create an image element and set its source to the uploaded file URL
          const uploadedImage = document.createElement('img');
          uploadedImage.src = data.url; // Use the 'url' from the server response
          uploadedImage.alt = 'Uploaded Image';
          // Append the image to the status display without overwriting existing content
          statusDisplay.appendChild(uploadedImage);
        })
        .catch(error => {
          statusDisplay.textContent = `Error: ${error.message}`;
        });
    });
  </script>

</body>

</html>
We have also added a CSS style sheet to make our webpage look a little cleaner. Let’s take a look:
body {
    font-family: 'Arial', sans-serif;
    background-color: #f7f7f7;
    margin: 0;
    padding: 20px;
    display: flex;
    justify-content: center;
    align-items: center;
    height: 100vh;
}

.container {
    background-color: #fff;
    padding: 20px;
    border-radius: 5px;
    box-shadow: 0 2px 4px rgba(0, 0, 0, 0.1);
}

h1 {
    color: #333;
    text-align: center;
}

form {
    display: flex;
    flex-direction: column;
    align-items: center;
}

input[type="file"] {
    margin: 10px 0;
}

button {
    background-color: #5cb85c;
    color: white;
    border: none;
    padding: 10px 20px;
    margin: 10px 0;
    border-radius: 5px;
    cursor: pointer;
}

button:hover {
    background-color: #4cae4c;
}

#uploadStatus {
    text-align: center;
    margin-top: 20px;
}

img {
    max-width: 100%;
    height: auto;
    border-radius: 5px;
}

#tags {
    background-color: #e9e9e9;
    padding: 5px;
    border-radius: 5px;
    margin-top: 10px;
}
Testing Our JavaScript Image Annotation App
Now that our app is complete, all we need to do is to test it out. So open your terminal and start your server using Node:
node server.js
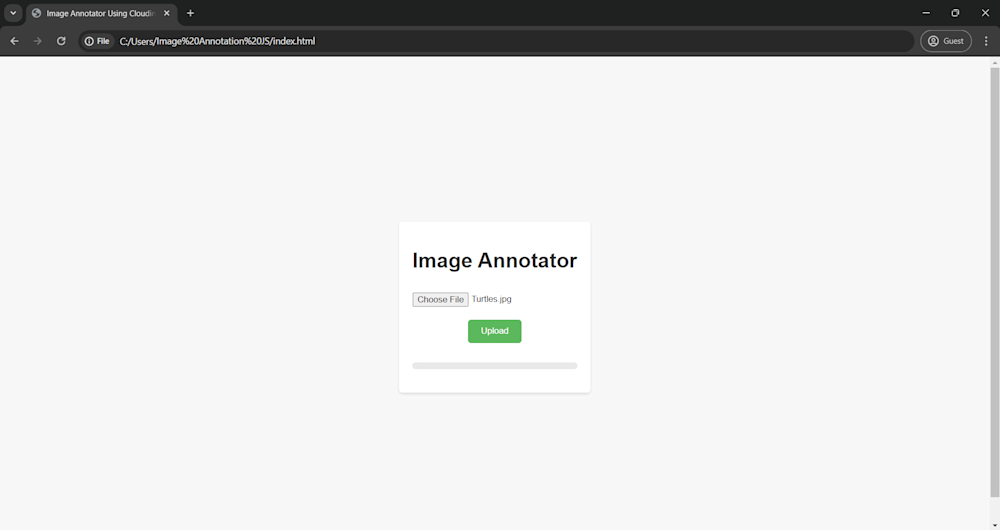
Next, open up your HTML in the browser of your choosing and click on the Choose File button to select a file for upload:

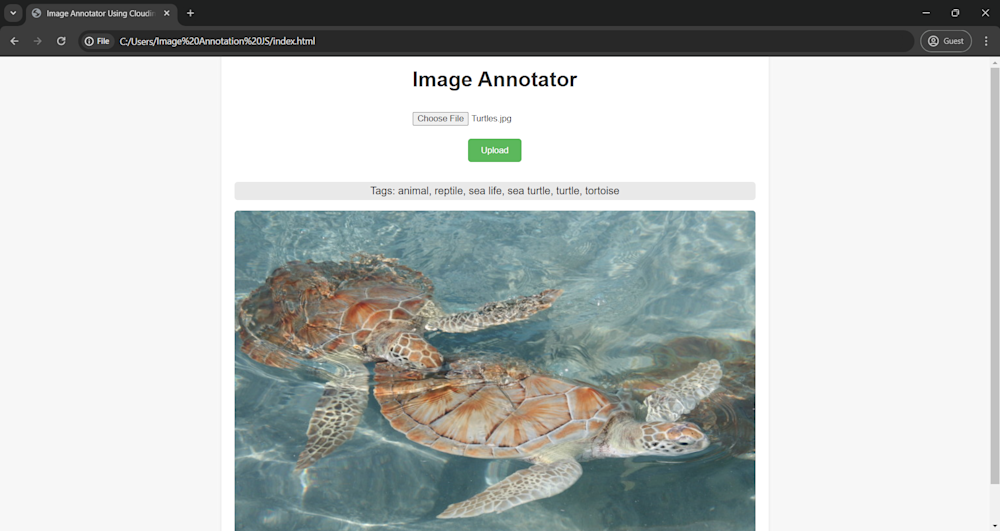
Here, we have chosen Turtles.jpg, obtained from the Cloudinary demo cloud.
Finally, click on the Upload button to upload the image to the Cloudinary cloud and generate the image annotations:

Final Thoughts
Mastering image annotation in JavaScript opens up exciting possibilities for web applications, content management systems, and creative projects. Combining Cloudinary’s versatility with custom annotation workflows can enhance user experiences, convey information effectively, and make your images interactive.
Cloudinary provides a solid foundation for image processing and delivery, making it an excellent choice for integrating with custom annotation workflows. Whether you’re building an e-commerce platform, a medical imaging application, or a content management system, Cloudinary’s versatility and scalability can enhance your image annotation capabilities.
Transform and optimize your images and videos effortlessly with Cloudinary’s cloud-based solutions. Sign up for free today!
More from Cloudinary:
Lazy-Loading JavaScript for High-Speed Webpage Performance
Cloudinary as the server-side for Javascript image cropping libraries


