
Quick access to accurate information is crucial in a development environment. The solution? Create a powerful chatbot that lives on your website and is designed to enhance the developer experience. Leveraging OpenAI, this chatbot will provide instant answers to queries from your developer documentation, helping users find what they need faster and more efficiently.
In this blog post, you’ll learn how to train a Model for your chatbot, generate an image with the DALL-E API, and generate the chat using the Chat Completion API.
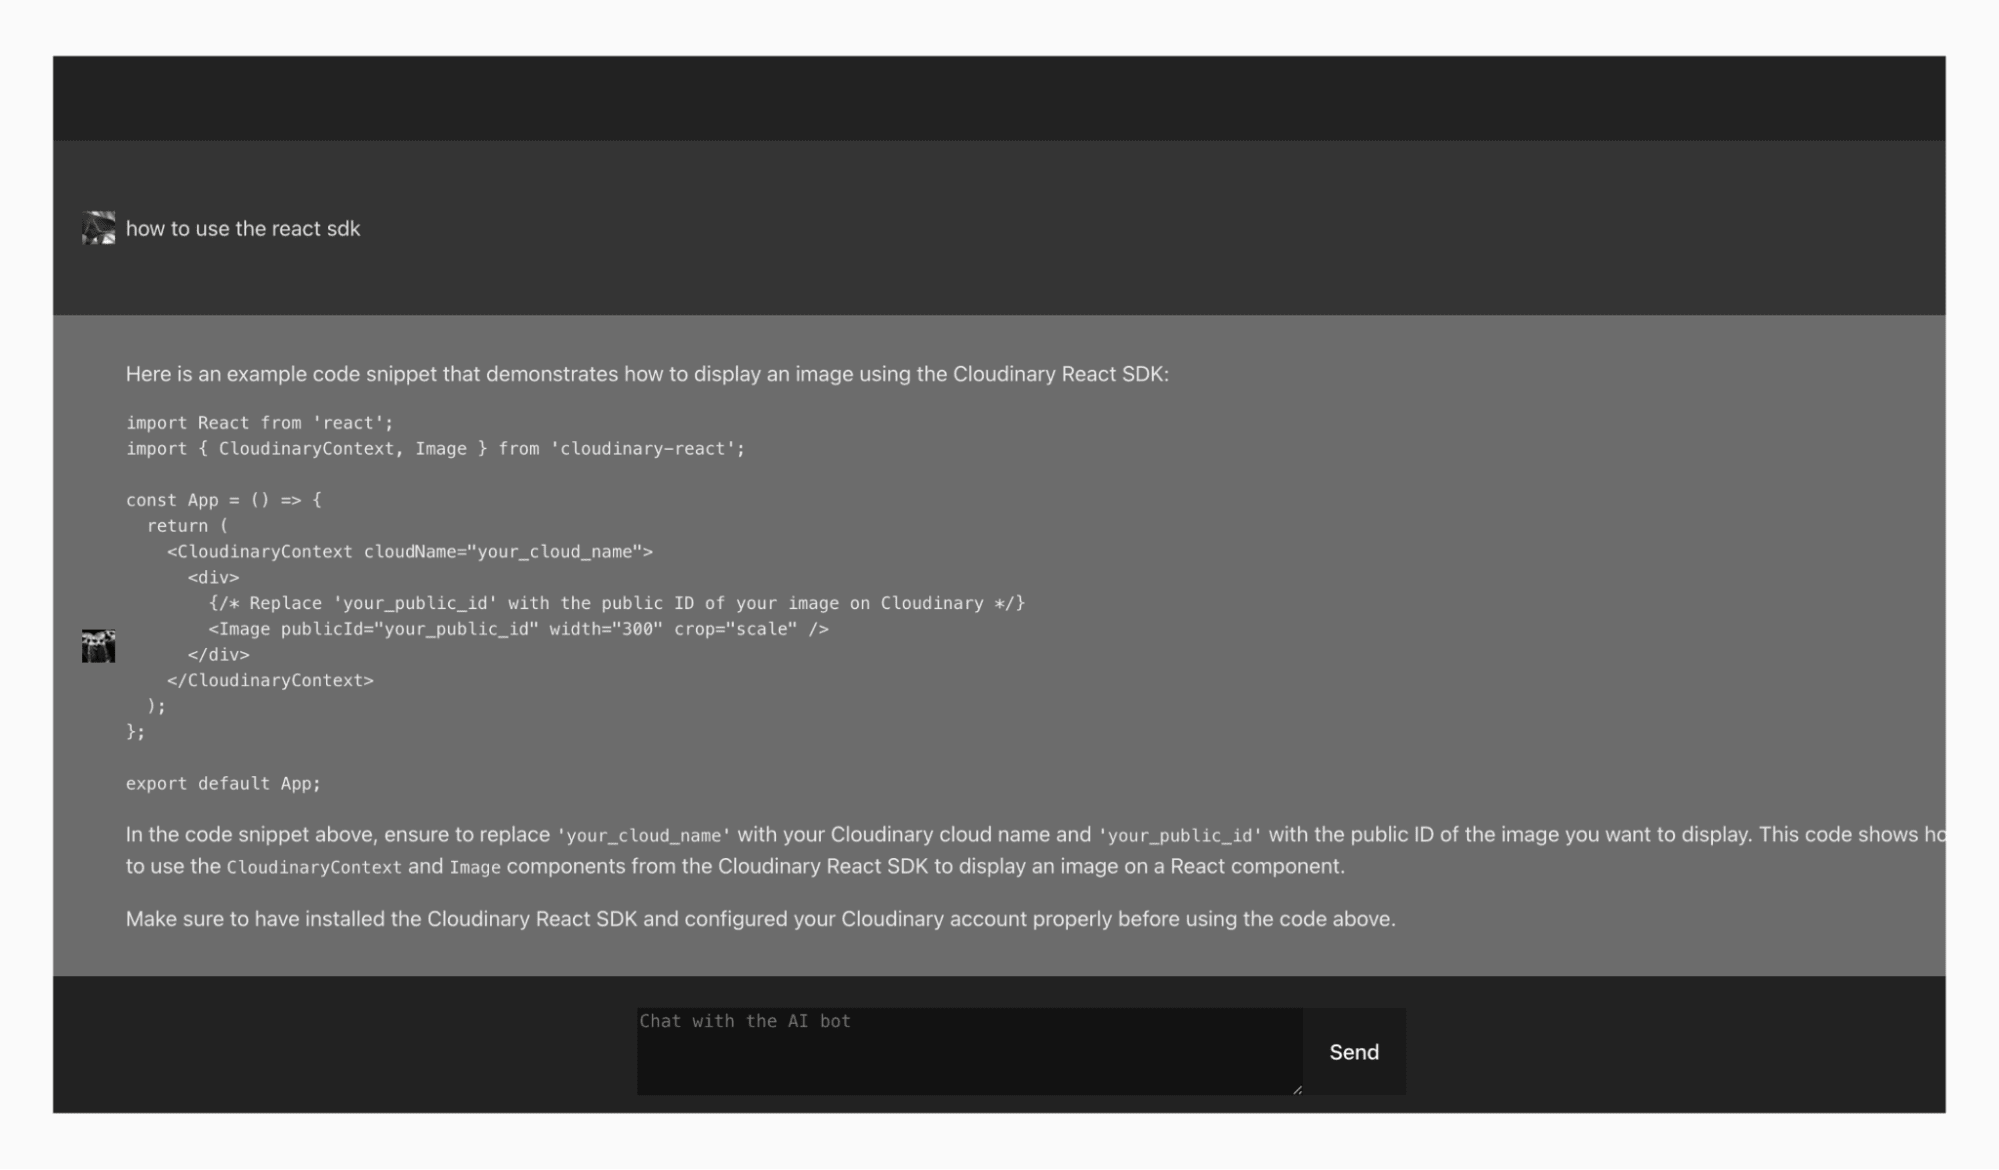
This is an example of an output of the app in which I ask how one can use the Cloudinary React SDK:
GitHub Repo: Cloudinary-Chatbot-OpenAI-Demo
To begin, log in to your OpenAI Platform account or create a free account. You’ll be redirected to your OpenAI dashboard.
Now, click your avatar in the top right corner, then click Your Profile and you’ll be redirected to your profile page.

Deposit money to start using the OpenAI API or SDK. Even an amount as small as $2-$5 is enough for you to start playing with OpenAI.
Inside the profile page, on the left side navigation, click Billing, then the green button Add payment details, and enter your bank account information to add credit to your account.

With OpenAI you can set charge limits so you won’t be surprised by an unexpected bill.
Generate an API Key to be used on our backend server to use the OpenAI services. To do this, on your left navigation bar, click YourProfile, then click Create new secret key.

In the pop-up, name your API key. I used chatbot. After entering your API key name, click Create secret key.


Copy and paste the API key generated into a safe place and click Done.
In this tutorial, I’m using Vite to build my React application. I recommend you to do the same. Follow the instructions on Vite’s official website to create a React application.
In your App.jsx file, replace the existing code with the following:
import { useState, useEffect } from "react";
import ReactMarkdown from "react-markdown";
import "./App.css";
function App() {
const [messages, setMessages] = useState([]);
const [inputMessage, setInputMessage] = useState("");
const [isLoading, setisLoading] = useState("START");
const [userImage, setUserImage] = useState(null);
const [assistantImage, setAssistantImage] = useState(null);
const handleMessageSend = async () => {
setisLoading("LOADING");
if (inputMessage.trim() === "") return;
const newMessages = [...messages, { role: "user", content: inputMessage }];
setMessages(newMessages);
setInputMessage("");
try {
const response = await fetch("api/chat", {
method: "POST",
headers: {
"Content-Type": "application/json",
},
body: JSON.stringify({ messages: newMessages }),
});
const data = await response.json();
const botReply = { role: "assistant", content: data.content };
setisLoading("DONE");
setMessages([...newMessages, botReply]);
} catch (error) {
return "Error"
}
};
// Scroll to the bottom of the chat window when new messages are added
useEffect(() => {
const chatContainer = document.getElementById("chat-container");
chatContainer.scrollTop = chatContainer.scrollHeight;
}, [messages]);
//Generate Image with Dall-e
useEffect(() => {
// Create a new avatar when the page loads
const generateImage = async () => {
try {
const response = await fetch("api/avatar", {
method: "POST",
headers: {
"Content-Type": "application/json",
},
body: JSON.stringify({ prompt }),
});
const data = await response.json();
console.log("images", data);
setUserImage(data[0].url);
setAssistantImage(data[1].url);
return data;
} catch (error) {
console.error(error);
}
};
generateImage();
}, []);
return (
<div className="App">
<div className="chat-container" id="chat-container">
{messages.map((message, index) =>
message.content !== undefined ? (
<div key={index} className={`message ${message.role}`}>
<img
src={message.role === "user" ? userImage : assistantImage}
alt="user image"
className="avatar"
/>
{message.role === "assistant" ? (
<div className="assistant-message">
<ReactMarkdown>{message.content}</ReactMarkdown>
</div>
) : (
message.content
)}
</div>
) : (
<div key={index} className="message assistant">
Error in the server
</div>
)
)}
{isLoading === "START" || isLoading === "DONE" ? (
<></>
) : (
<div className="spinner-bar">
<div className="spinner chat"></div>
</div>
)}
</div>
<div className="input-container">
{assistantImage !== null && userImage !== null ? (
<>
<textarea
rows="4"
cols="50"
value={inputMessage}
onChange={(e) => setInputMessage(e.target.value)}
placeholder="Chat with the AI bot"
/>
<button onClick={handleMessageSend}>Send</button>
</>
) : (
<div className="spinner"></div>
)}
</div>
</div>
);
}
export default App;
Code language: PHP (php)This code has three main components:
1. handleMessageSend(). This function is responsible for sending the new user message along with the previous conversation history to the NodeJS back end.
2. first useEffect(). This useEffect improves the user experience by automatically scrolling the screen to focus on the latest messages whenever a new message is sent and a response is received from the chatbot.
3. second useEffect(). This useEffect triggers a call to the backend to generate avatars using DALL-E, creating one avatar for the user and another for the chatbot.
Let’s now style the app. In your app, replace the code inside of the App.css with the code inside of this file.
If you want to easily make a call to your NodeJS backend without using CORS, you can configure your Vite app to proxy the backend endpoints. This step only applies if you created the React app using Vite.
Open your vite.config.js file and replace the content with the following code.
import { defineConfig } from 'vite'
import react from '@vitejs/plugin-react'

export default defineConfig({
  plugins: [react()],
  server: {
    port: 3000,
    proxy: {
      "/api": {
        target: "http://localhost:6000",
        changeOrigin: true,
        secure: false,
      },
    },
  },
});
Code language: JavaScript (javascript)
What we’re doing here is proxying the backend with any path that is /api to be forwarded to the target http://localhost:6000, which is the address of your backend server.
Time to work on the backend. In the root of your React app, create a folder called back end. Inside this folder create a server.js file.
In the root of the project you have the package.json, we will use this same file for our backend. Replace everything that you currently have in the package.json copy and paste the content of this file into your package.json.
In the root of your project create a .env file, and enter the following:
OPENAI_API_KEY="YOUR OPEN AI API KEY"Code language: JavaScript (javascript)Replace the string with the OpenAI API Key you generated earlier.
Copy paste the following code into your server.js file.
/* eslint-disable no-undef */
import express from "express";
import bodyParser from "body-parser";
import OpenAI from "openai";
import "dotenv/config";


const openai = new OpenAI({
 apiKey: process.env.OPENAI_API_KEY,
});


const app = express();
app.use(bodyParser.json());


app.post("/api/chat", async (req, res) => {
 /*
   Train the model by giving it some previous conversations
   */
 const demoModel = [
   {
     role: "user",
     content:
       "Hi, can you tell me where to find information about the Cloudinary React sdk?",
   },
   {
     role: "assistant",
     content:
       "Yes, the conentent can be found inside of this website https://cloudinary.com/documentation/react_integration",
   },
   {
     role: "user",
     content:
       "can you tell me where to find information about the cloudinary transformations",
   },
   {
     role: "assistant",
     content:
       "Yes, the conentent can be found inside of this website https://cloudinary.com/documentation/react_image_transformations",
   },
   {
     role: "user",
     content: "can you tell me how to display an image using the cloudinary React SDK",
   },
   {
     role: "assistant",
     content: `Yes, to display an image using cloudinary follow this guide https://cloudinary.com/documentation/react_integration#landingpage and this code sample
     import React from 'react'
     import {AdvancedImage} from '@cloudinary/react';
     import {Cloudinary} from "@cloudinary/url-gen";

     // Import required actions.
     import {sepia} from "@cloudinary/url-gen/actions/effect";

     const App = () => {

       // Create and configure your Cloudinary instance.
       const cld = new Cloudinary({
         cloud: {
           cloudName: 'demo'
         }
       });

       // Use the image with public ID, 'front_face'.
       const myImage = cld.image('front_face');

       // Apply the transformation.
       myImage
       .effect(sepia());  // Apply a sepia effect.

       // Render the transformed image in a React component.
       return (
         <div>
           <AdvancedImage cldImg={myImage} />
         </div>
       )
     };
       `,
   },
 ];


 const { messages } = req.body;
 messages[messages.length - 1].content = `${
   messages[messages.length - 1].content
 }.`;


 /**
  * Call the OpenAI SDK and get a response
  */
 try {
   const response = await openai.chat.completions.create({
     model: "gpt-3.5-turbo",
     messages: [...messages, ...demoModel], // pass the new message and the previous messages
   });
   res.json(response.choices[0].message);
 } catch (error) {
   console.error(error);
   res.status(500).json({ error: "Internal Server Error" });
 }
});


/**
* Generate a random animal avatar
* using DALLE
*/
app.post("/api/avatar", async (req, res) => {
 const requestData = {
   prompt: `generate picture of animal`,
   n: 2,
   size: "256x256",
 };


 try {
   const response = await fetch(
     "https://api.openai.com/v1/images/generations",
     {
       method: "POST",
       headers: {
         "Content-Type": "application/json",
         Authorization: `Bearer ${process.env.OPENAI_API_KEY}`,
       },
       body: JSON.stringify(requestData),
     }
   );


   if (response.ok) {
     const data = await response.json();
     console.log("Response:", data);
     res.json(data.data);
   } else {
     throw new Error(`HTTP error! status: ${response.status}`);
   }
 } catch (error) {
   console.error("Error:", error);
   res.status(500).json({ error: "Internal Server Error" });
 }
});


const PORT = 6000;
app.listen(PORT, () => {
 console.log(`Server is running on port ${PORT}`);
});
Code language: PHP (php)
Let’s explain the code we have on our server.
This code defines an endpoint for a chat application that integrates with OpenAI’s GPT-3.5-turbo model to generate responses based on user messages. Here’s a detailed explanation:
1. Route definition:
app.post("/api/chat", async (req, res) => {Code language: JavaScript (javascript)This line defines a POST endpoint at /api/chat. The async keyword indicates that the function will be handling asynchronous operations, which is crucial for making API calls.
2. Demo model setup:
const demoModel = [
        {
          role: "user",
          content: "Hi, can you tell me where to find information about the Cloudinary React sdk?",
        },
        {
          role: "assistant",
          content: "Yes, the content can be found inside of this website https://cloudinary.com/documentation/react_integration",
        },
        // Additional demo messages...
    ];
Code language: JavaScript (javascript)
This array demoModel simulates previous conversations. It includes several user and assistant interactions about using the Cloudinary React SDK. These examples help guide the model by providing context.
3. Handling incoming messages:
const { messages } = req.body;
    messages[messages.length - 1].content = `${messages[messages.length - 1].content}.`;Code language: JavaScript (javascript)
The code extracts the messages array from the request body. It also modifies the last message by appending a period to its content, ensuring proper punctuation.
4. Calling OpenAI’s API:
 try {
      const response = await openai.chat.completions.create({
        model: "gpt-3.5-turbo",
        messages: [...messages, ...demoModel],
      });
      res.json(response.choices[0].message);
    } catch (error) {
      console.error(error);
      res.status(500).json({ error: "Internal Server Error" });
}Code language: JavaScript (javascript)- The try block attempts to call the OpenAI API to get a response from the GPT-3.5-turbo model.
- openai.chat.completions.create is used to generate the response, passing both the incoming messages and the predefined demoModel to provide context.
- If successful, it sends the first choice’s message back as a JSON response.
- If an error occurs, it logs the error and responds with a 500 status code and an error message.
This code defines an endpoint for generating random animal avatars using OpenAI’s DALL-E model. Here’s a detailed explanation:
1. Route definition:
app.post("/api/avatar", async (req, res) => {Code language: JavaScript (javascript)This line defines a POST endpoint at /api/avatar. The async keyword indicates that the function will be handling asynchronous operations, which is necessary for making API calls.
2. Request data setup:
const requestData = {
prompt: `generate picture of animal`,
n: 2,
size: "256x256",
};Code language: JavaScript (javascript)
This object, requestData, contains the parameters for the DALL-E API request:
- prompt. A text prompt instructing DALL-E to generate a picture of an animal.
- n. Specifies that two images should be generated.
- size. Specifies the size of the generated images (256×256 pixels).
3. Calling OpenAI’s API:
try {
      const response = await fetch(
      "https://api.openai.com/v1/images/generations",
      {
         method: "POST",
         headers: {
          	"Content-Type": "application/json",
           Authorization: `Bearer ${process.env.OPENAI_API_KEY}`,
          },
          body: JSON.stringify(requestData),
        }
);Code language: JavaScript (javascript)- The try block attempts to make a POST request to the OpenAI DALL-E API endpoint using the fetch function.
- The request includes:
- method. Specifies the HTTP method (POST).
- headers. Contains the content type (
application/json) and authorization header with the OpenAI API key. - body. The requestData object is converted to a JSON string and sent as the request body.
4. Handling the response:
 if (response.ok) {
    const data = await response.json();
    console.log("Response:", data);
    res.json(data.data);
 } else {
    throw new Error(`HTTP error! status: ${response.status}`);
}Code language: JavaScript (javascript)- If the response from the API is successful (
response.ok), it converts the response body to a JavaScript object usingresponse.json(). - It logs the response data to the console and sends the relevant part of the data (
data.data) as a JSON response to the client. - If the response isn’t successful, it throws an error with the HTTP status code.
The first thing we have to do is to run npm install in the root of your project to install the frontend and backend dependencies.
Dependencies:
- dotenv. Loads environment variables from a
.envfile intoprocess.env, helping manage configuration settings securely. - express. A minimal and flexible Node.js web application framework that provides a robust set of features to build web and mobile applications.
- node-fetch. A lightweight module that brings
window.fetchto Node.js, allowing you to make HTTP requests from a server environment. - nodemon. A development tool that automatically restarts your Node.js application when a file changes in the directory is detected, improving the development workflow.
- openai. The official OpenAI client library for accessing OpenAI’s API, including GPT-3 and DALL-E, to generate text and images.
- react. A JavaScript library for building user interfaces, particularly single-page applications, by creating reusable UI components.
Open your terminal and run npm run start. Nodemon will run your express server in NodeJS.
Open your other terminal run npm run dev and navigate to http://localhost:3000/.
You should see this:

We demonstrated how to create a powerful chatbot for your website to provide instant answers to queries from your developer documentation. With the chatbot, users can find the information they need faster and more efficiently, enhancing the developer experience and productivity.
Additionally, we’ve shown how to integrate features such as generating animal avatars using DALL-E, adding a fun and engaging element to your application. With tools like Express for backend handling, node-fetch for API requests, and dotenv for secure configuration, your chatbot can seamlessly provide valuable support to developers.
Contact us today to learn more about how to save developer hours by using Cloudinary’s Programmable Media, which enables you to implement comprehensive image and video upload, transformation, optimization, and delivery capabilities using your favorite programming languages.
To stay updated with the latest product features, follow Cloudinary on Twitter, explore other sample apps, and join our Discord server and Community forum.
- GitHub Repo: Cloudinary-Chatbot-OpenAI-Demo
- Additional resources:


