Programmable Media service introduction
Last updated: Aug-29-2024
Before you dive into the details of Cloudinary's many asset management features and begin adding Cloudinary Programmable Media capabilities to your application, we recommend that you review this page to gain a high-level understanding about the service architecture, asset storage, security, and other details about how the Cloudinary service works.
- Programmable Media Get Started Guide: Learn the steps involved and the questions you may need to consider at each step in order to successfully implement Cloudinary's Programmable Media capabilities in your application code, from initial account creation and setup, through to delivering transformed and optimized media in production.
-
SDK Quick Starts: Step-by-step copy-code snippets that help you get a Cloudinary Programmable Media project set up, configured and running in your favorite language in 5 minutes or less.
- Try it! Code explorers and feature demos: Quick links to all the available inline code explorers, sandboxes, and interactive feature demos, designed to help you 'play & learn' with a variety of Cloudinary features.
- Onboarding FAQ: A collection of the questions most commonly asked by developers who are evaluating or getting started with Cloudinary Programmable Media.
Service architecture
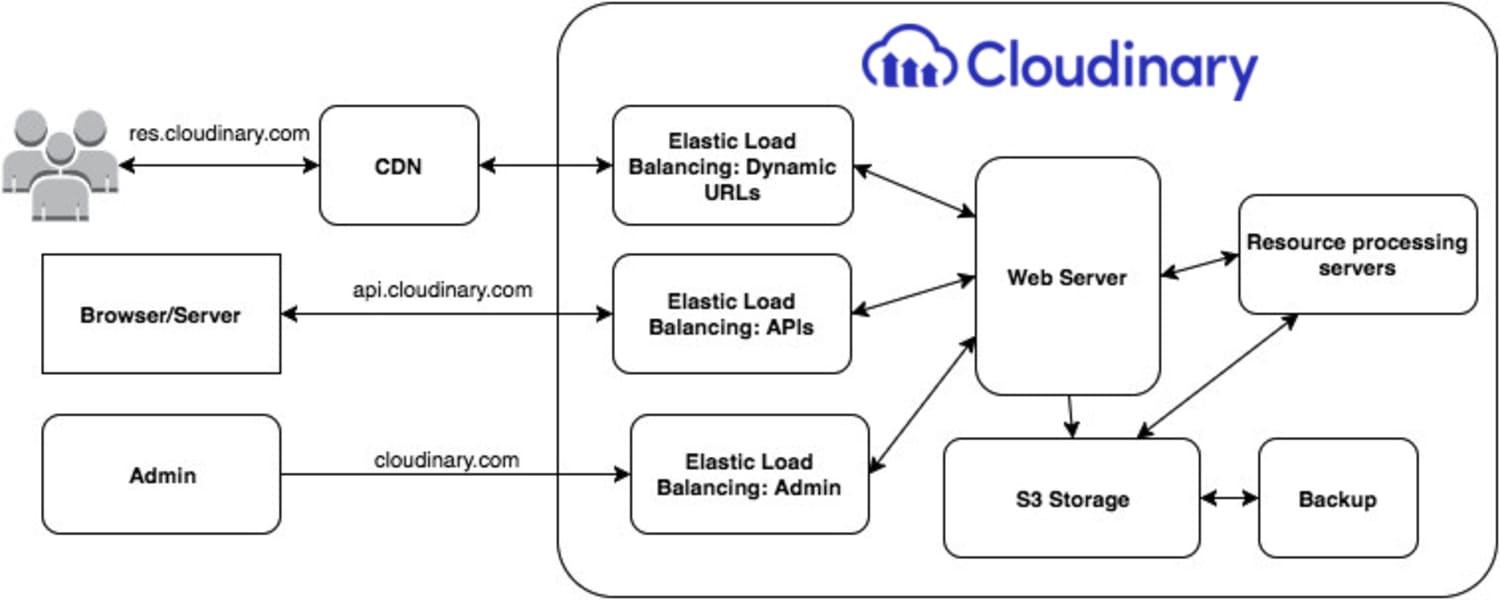
Cloudinary's media asset management service includes:
- High performance servers behind Elastic Load Balancers that support fast upload and download rates.
- Highly available storage that promises that your assets are always available and safe.
- High performance media processing servers for generating your requested images and videos.
By default, assets are stored in Amazon S3 buckets that are privately accessed for writing. These can be shared buckets, dedicated buckets or private buckets.
Delivery lifecycle
The asset delivery lifecycle consists of 5 stages: Upload, Storage, Administration, Transformation, and Delivery.
Once the original file has been uploaded to Cloudinary, you can manage the asset via secured APIs or the Cloudinary Console, and embed dynamic asset URLs in your web page to deliver various versions of the original asset. The dynamic URLs include instructions on how to transform the asset before delivery.
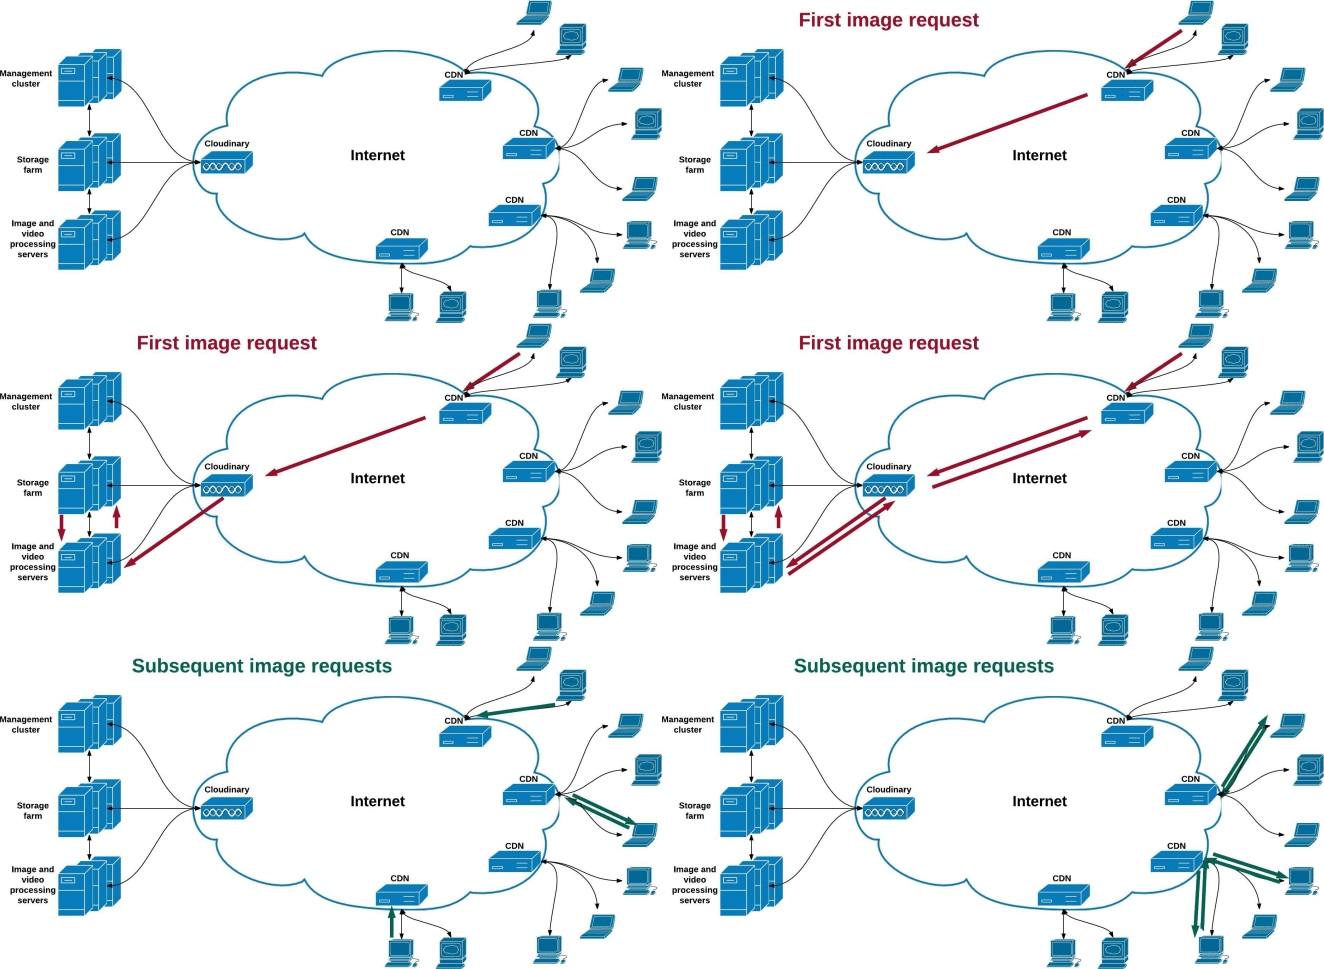
The first time a transformed asset is requested via a dynamic delivery URL:
- The asset is requested by the user's browser.
- The asset request reaches the closest CDN edge server.
- The CDN edge servers checks if the asset is cached - it is not.
- The CDN edge server requests the asset from Cloudinary.
- Cloudinary generates the transformed asset as per the dynamic URL instructions.
- Cloudinary returns the asset to the CDN edge server.
- The CDN edge server caches the image and then returns the image to the user's browser.
Subsequent requests for the transformed asset via the same dynamic delivery URL:
- The asset is requested by the user's browser.
- The asset request reaches the closest CDN edge server.
- The CDN edge servers checks if the asset is cached - it is.
- The CDN edge server returns the image to the user's browser.
For a complete reference of possible transformations see the Transformation URL API Reference.
Scaling
Cloudinary's architecture was built from the ground up to support high load and handle a practically unlimited amount of assets and usage. Cloudinary's service includes a multitude of powerful cloud-based upload and transformation servers, with each server optimized to handle a very high rate of uploads, downloads, and complex image transformations. Cloudinary's servers also automatically scale to easily manage large traffic peaks with advanced load balancers that are used to distribute the load between all our servers. Finally, an enterprise-grade content delivery network delivers assets quickly and efficiently through thousands of global delivery servers.
Security
Cloudinary's secure and safe cloud-based solution is accessible via secure and authenticated HTTPS APIs, with flexible API key provisioning using the access_keys endpoint. Cloudinary's security features include:
- Automatic backup of assets to a secondary protected location.
- Complete asset access control.
- Restricted access to assets based on specific transformations, file types and referral sites via the Security page of the Console Settings.
- Authenticated image access with signed URLs.
- Access control with multiple user roles and permissions, leveraging two-factor authentication (2FA), 3rd-party service provider logins (such as Google or GitHub), or SSO. You can set these preferences via the Account Security page of the Cloudinary Console Settings.ImportantIf you signed up through a third-party login (e.g., Google, GitHub, or Heroku), changing your email associated with the third-party login without first establishing direct access to your Cloudinary account can result in being unable to log in. Before changing your third-party email, be sure to establish direct access to Cloudinary via the My Profile page of the Console Settings.
Storage
Assets uploaded to Cloudinary and all generated assets are safely stored and managed by Cloudinary on high-performance servers that support fast upload and download rates.
By default, Amazon's Simple Storage Service (S3) is leveraged for asset management and assets are stored in S3 buckets that are privately accessed for writing. These can be shared buckets, dedicated buckets or private buckets.
Google Cloud Storage is also available for primary and/or backup storage. This is a premium feature that requires a special setup. For more information, contact customer support.
APIs
Cloudinary offers several Programmable Media APIs:
- Upload API - methods for uploading assets, creating new assets such as text images, ZIP files and sprites, and transforming existing assets.
- Admin API - A secure API with methods for browsing, deleting, and restoring existing assets, and for managing upload presets, upload mappings, and transformations. This API also includes the search method and metadata method.
- Provisioning API - A secure API that enables account administrators to create and manage their account, product environments, users and user groups programmatically.
- URL API - a URL-based API for delivering assets. Includes dynamic asset transformations, fetching remote assets, and optimizing delivery of the assets. Asset URLs are dynamically mapped to CDN distributions that forward the requests to Cloudinary servers which generate the transformed asset on-demand and deliver them optimized to users.
URLs and endpoints
The URLs for accessing Cloudinary are based on your cloud name, and you can access your public web assets using dynamic URLs. The full URLs of the images or videos you deliver include various parts including the name of the asset, its version and transformation settings. However, all your delivery URLs use the same base URLs.
The base URL will also include your cloud name. For example, if your cloud name is 'demo', the base URLs will be:
- 'api.cloudinary.com/v1_1/demo/' - the base URL for accessing Cloudinary's secure API.
- 'https://res.cloudinary.com/demo/' - the base URL for Cloudinary's shared CDN Distribution (all Plans).
- 'https://demo-res.cloudinary.com/' - the base URL for a private CDN Distribution (Advanced plans and higher only).
Building full URLs for accessing your assets is done automatically if you are using our SDKs. However, you can also build these URLs manually. For example, if your cloud name is 'demo' and you want to deliver the uploaded 'sample.jpg' file, simply point to:

This means that in your HTML code you can simply add the following tag:
For more information and details on constructing dynamic URLs see Delivering images using dynamic URLs.
API keys
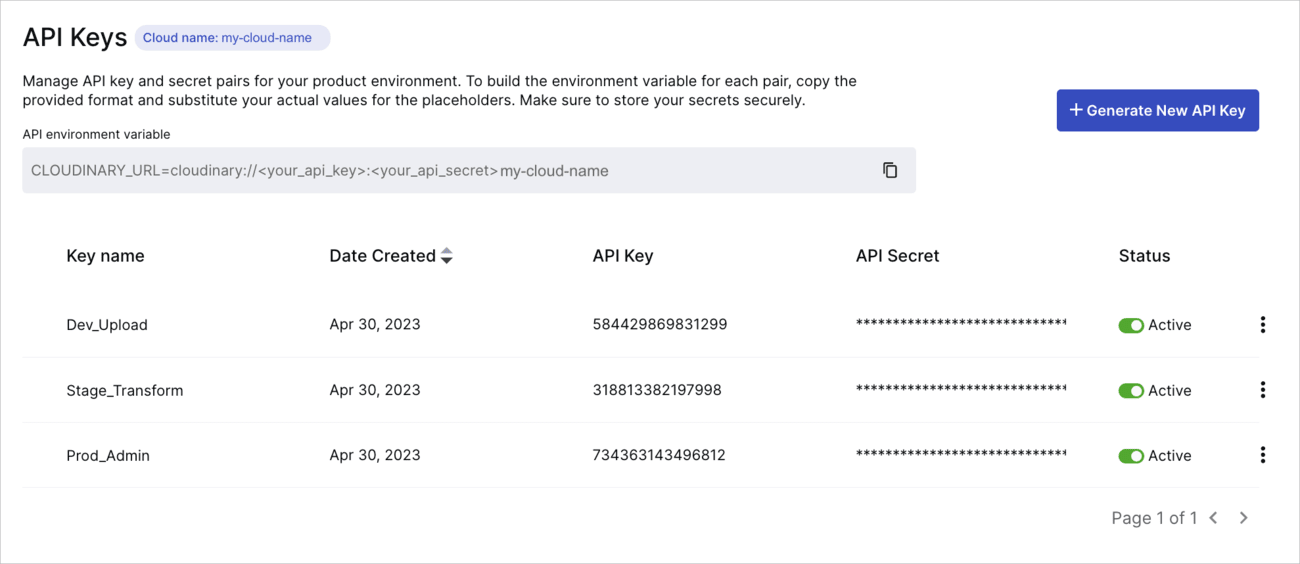
You'll need an API key and its secret, along with the Cloud name of your product environment, to configure your SDK or to directly run API requests against that product environment.
You can find all these credentials on the API Keys page of the Console Settings.
The API environment variable combines all three credential values into a single string. Copy the API environment variable format from the API Keys page of the Cloudinary Console Settings. Replace <your_api_key> and <your_api_secret> with your actual values, while your cloud name is already correctly included in the format.
You can also manage your API keys from the API Keys page of the Console Settings. This allows you to generate new API key and secret pairs, activate them, and assign them names under the same cloud name. Generating multiple keys for various purposes—such as development, staging, and production environments—each with meaningful names for easy identification, helps organize access and usage according to different needs. If you have more than one API key in your product environment, you can deactivate and delete keys as needed to maintain security and control access.
- Your cloud name and API key are specific to a product environment and are used for enabling or configuring a variety of Cloudinary Programmable Media features. As mentioned above, your cloud name is also a part of every media asset URL you deliver from Cloudinary. There's no problem to include these two values in client-side code.
- Your API secret is used for authentication and should never be exposed in client-side code or in any other way outside your organization.
- By default, new accounts have only one product environment. Paid accounts can have multiple product environments that can be used for things such as production and staging environments, or you might have different product environments to parallel different products, websites, organizations, geographies, or apps that you use with Cloudinary.
Granular API key permissions for Upload and Admin APIs
You may want to allow certain developers to run specific endpoints in the Admin and Upload APIs and their equivalent SDK methods, and deny them from running others. You can create multiple API keys on the API Keys page of the Cloudinary Console Settings, and then coordinate with a Cloudinary solutions engineer to customize the keys for your product environment, with each key allowing access to different endpoints or groups of endpoints. You can then assign each customized API key to different developers to control who can perform which programmatic actions in your product environment.
For example, you might want to allow certain developers to:
- Use only GET methods, i.e., read-only permissions.
- Use only the
transformations,upload_presetsandstreaming_profilesendpoints, with both read and write capabilities. - Use all endpoints except DELETE methods.
If a user makes a call to an endpoint that's restricted by the API key, an error message stating that the provided API key doesn't have permission to run the API call is returned.
To set up granular permissions for your API keys:
Create all the API keys you want to customize from the API Keys page of the Cloudinary Console Settings.
Make a request to Cloudinary support to configure your permissions. When making your request, specify the API keys to update and the list of Upload API and Admin API endpoints you want to restrict for each one. For example, "Please restrict the
: GET /streaming_profilesandPOST /transformations/:nameendpoints for the API key named:front-end-developers."
Limitations and considerations for API key permissions:
- Actions that are restricted in the API are still allowed via the Media Library. For example, if the metadata field endpoint is restricted by the API key, the user can still access metadata via the Media Library.
- Any developers whose access you want to limit must also be restricted to the Media Library admin or Media Library user roles, so that they won't have access to API key/secret pairs that are not configured for them.
- Actions in the Upload API can only be restricted for signed upload requests.
- If the API key status is set to
disabled, then any requests made using that API key will be denied in any case.
Embeddable widgets
Cloudinary provides a variety of tools that you can embed in your applications to provide additional functionality for your users with just a few lines of code.
Upload Widget
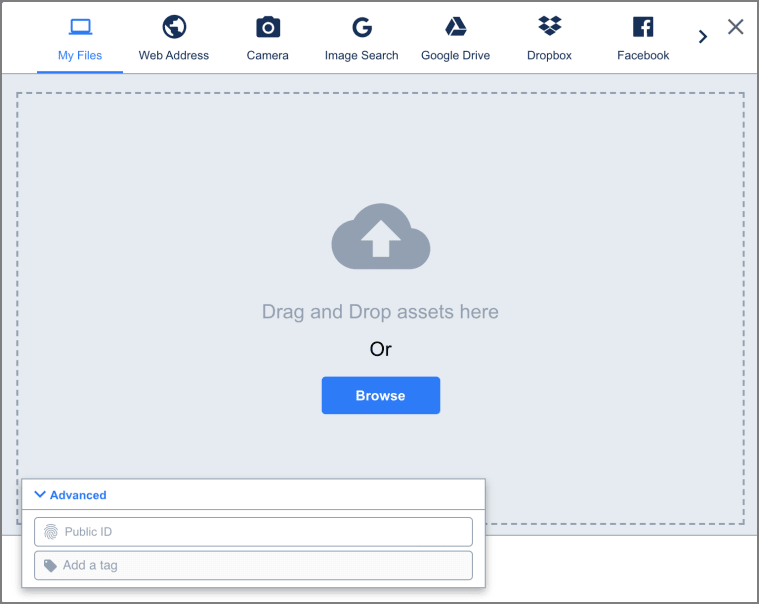
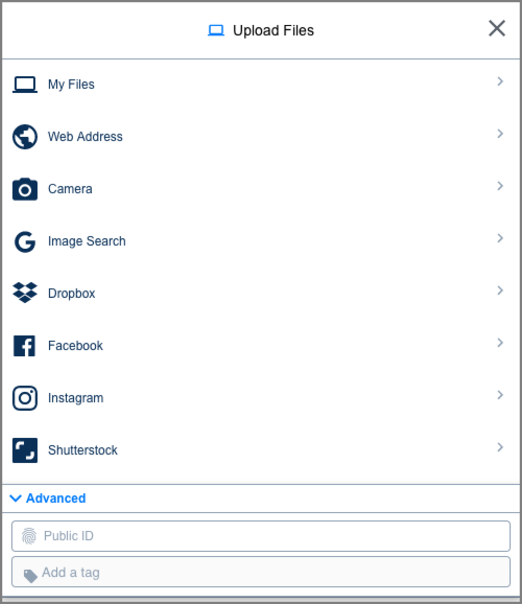
The Upload Widget is a responsive, interactive UI that enables your users to upload files from a variety of sources to your website or application. For example, they can upload from their local device, their device camera, or from social media accounts like Dropbox, Instagram or Facebook. You can also customize the look and feel of the widget, configure special behaviors, or take advantage of the widget's extensive event handling to integrate your own code.
Product Gallery
Cloudinary's Product Gallery is an interactive user interface for displaying your products to your users on your website or application. The Product Gallery requires only pure JavaScript to integrate, is easy to use within any web development framework, and eliminates the need to develop an in-house interactive media gallery with just a few lines of code.
Video Player
The Cloudinary Video Player is a JavaScript-based HTML5 video player bundled with many valuable customization and integration capabilities, and is monetization and analytics-ready. The player is fully responsive for use on any device or screen size, and is integrated with Cloudinary's video delivery and transformation solution.
Media Library Widget
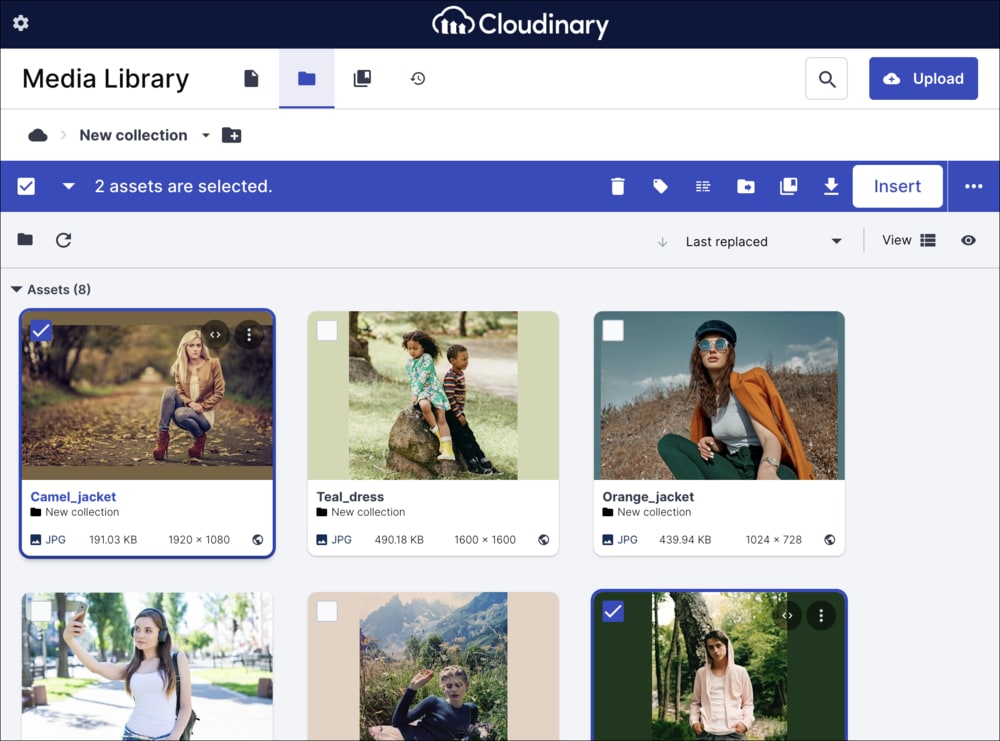
In addition to Programmable Media widgets, you can seamlessly integrate the Media Library widget into your custom integrations. This allows you to embed a compact version of the Media Library within your CMS or any web application. Your employees or end users can effortlessly search for and select images, videos, PDFs, or other stored raw files directly from a Cloudinary product environment. Then, they can insert them in a way that precisely fits your application design, required behavior, and overall workflow.
Media Editor
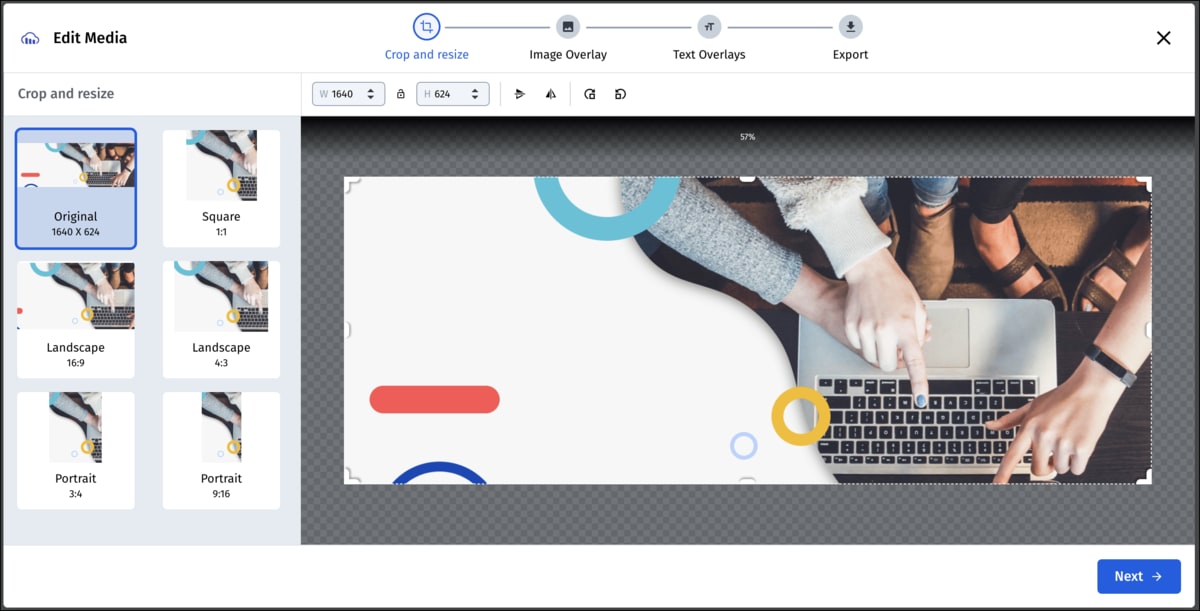
Cloudinary's Media Editor is an interactive user interface providing a set of common image editing actions to your users on your website or application. The editor helps to scale internal operations by reducing dependency on designers for simple recurring tasks. Combined with AI for automating simple actions, this allows manual review / fixing of media assets when needed.
Cloudinary Console
You can use the web-based Cloudinary Console to administer your Cloudinary account and product environments.
What's a product environment?
A product environment (previously known as a sub-account) is an entity within your account that includes an asset repository, some product environment-specific settings, and other elements that are stored in your product environment and help you manage it, such as upload presets, named transformations, and more.
A product environment can represent a production or staging environment, different organizations, products, or geographic sites that you want to manage separately within a single Cloudinary account.
You can manage the elements related to a product environment via the Cloudinary Console or programmatically using the Admin API.
This section describes the options available for the Programmable Media product. For details on working with Digital Asset Management, see the Digital Asset Management Overview.
Console Options
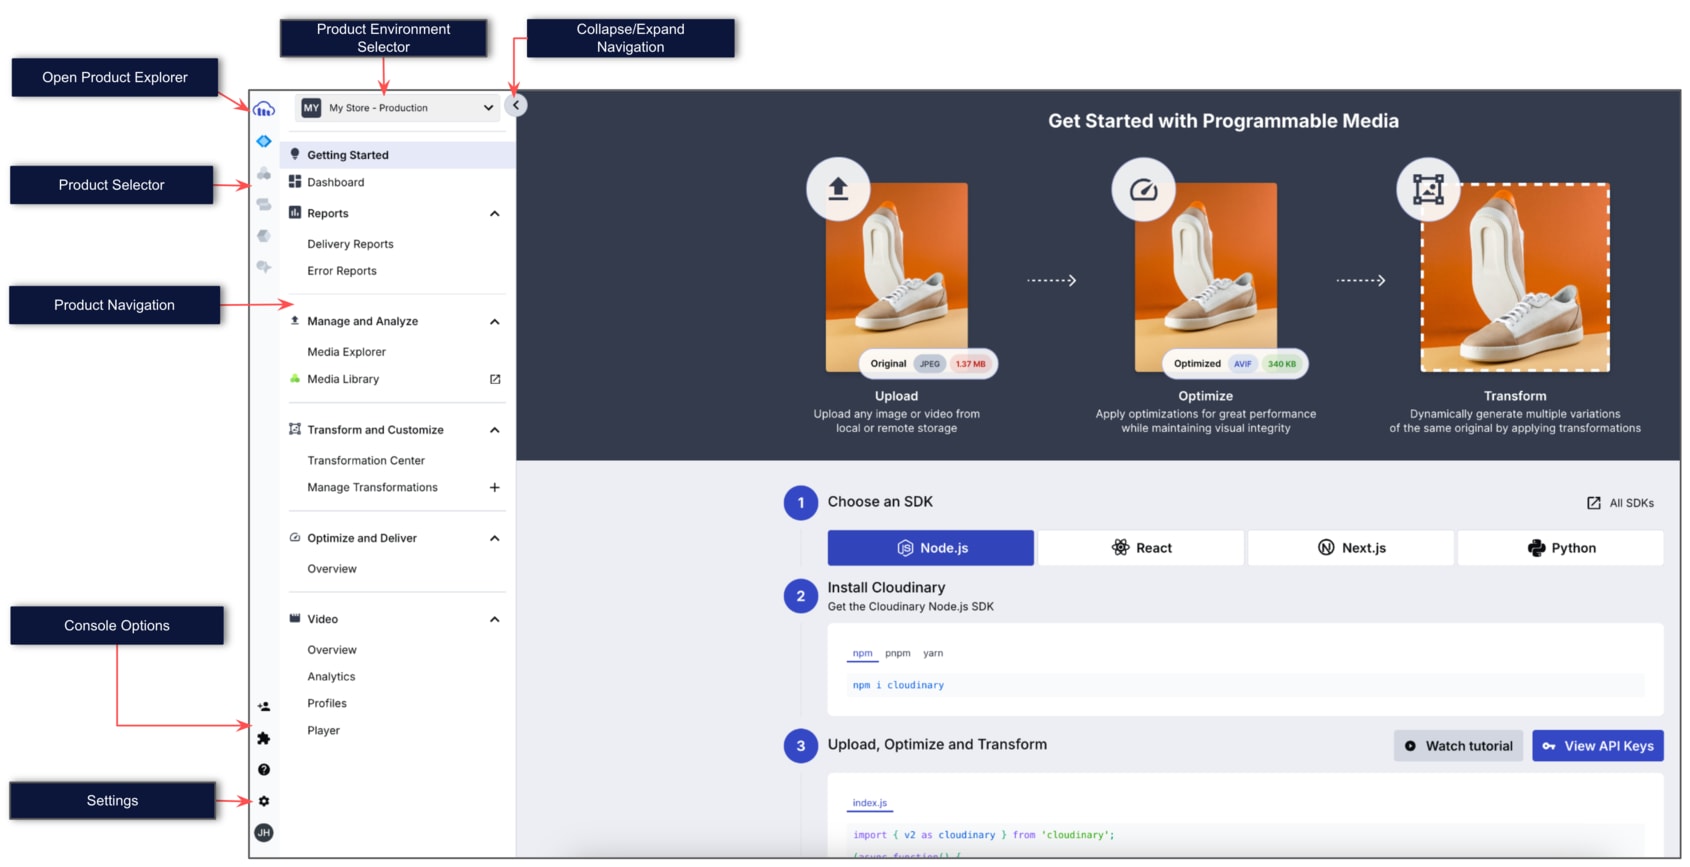
The following options are available from the Console Options sidebar, located at the far left of the Console:
| Option | Description |
|---|---|
 |
Open the Product Explorer to learn about Cloudinary's product offerings, including descriptions, feature lists and insights into how each product can significantly enhance your workflow. |
| Product selector | Click the logo for the Cloudinary product you want to work with to display the navigation options for that product. |
| --- | |
| Invite new users | Add new users to your account. Learn more. |
| Help | Access a variety of resources to learn more about working with Cloudinary including documentation, get customer support, view the latest release notes for your active product, find training courses, read blog posts, and more. |
| Settings | Manage your personal profile, account-level settings, and product environment-level settings. These settings allow you to control and tweak almost every aspect of your asset pipeline behavior. |
| Profile avatar | Jump to your profile settings, invite friends to sign up for Cloudinary and earn extra credits, or log out of your account. |
Programmable Media navigation options
When the Programmable Media product is selected, the following options are available from the Product Navigation menu, divided into several collapsible sections:
| Option | Description |
|---|---|
| Product environment selector | Enables you to switch between product environments or create a new one. Note: Free accounts support only one product environment. |
| --- | |
| Getting Started | Provides developer onboarding content including quick code snippets to help you configure SDKs, upload assets, deliver transformations, as well as introductory information about other Cloudinary features and resources. |
| Dashboard | View details about your account, product environment, and plan as well as usage status of assets, transformations, storage, bandwidth and add-ons. |
| Reports | Get insights on your assets with usage reports, in-depth analytics and recommendations. For details, see Account usage data. |
| Manage and Analyze | |
| Media Library | A UI for easily browsing and searching through your existing assets, drag & drop upload, and much more. For details, see the DAM user guide. |
| Media Explorer | A UI, specifically for developers, which allows you to browse through your existing assets and see SDK code snippets for actions performed, such as uploading and deleting assets. For details, see Media Explorer. Note: Some users may additionally have a link from here to jump to the Assets Media Library. |
| Transform and Customize | |
| Transformation Center | Explore and experiment with transformations across a variety of images and videos. Create and save new transformations using the Transformation Builder. |
| Manage Transformations | Edit and manage all your named transformations in the Named Transformations tab, and view a filterable list of all transformations delivered from your product environment in the Log tab. |
| Optimize and Deliver | |
| Overview | Experiment with optimizations in the optimization playground, learn more about how to deliver your images and videos fast while maintaining visual quality, and fine-tune how your images and videos are optimized for delivery. |
| Video | |
| Overview | Offers a user-friendly hub with quick access to resources for embedding the Video Player, implementing video streaming, utilizing analytics, applying edits, and managing videos efficiently. |
| Analytics | Provides insights into the videos you deliver using the Video Player. Explore metrics on total video loads, most-watched videos, and key demographics like top devices, browsers, and countries. |
| Player | Provides direct access to the Video Player Studio, where you can experiment with the Cloudinary Video Player customization options and automatically generate the code to embed your customized player into your site. |
Transformation counts
Your account's monthly pricing plan is in part dependent on the total number of transformations performed during a 30-day cycle. Transformation counts are impacted by each processing of an asset. For details, see How are transformations counted?.
 Programmable Media
 Digital Asset Management
